Living in a mild climate like the Pacific Northwest, with cool summers that rarely get above 70º F (22º C), it’s always sweater weather! And anytime is the right time to teach yourself to knit!
Most mornings I wear one of my hand-made cardigans. Even though it still feels like summer out with endless warm sunny days, when October comes around I start thinking about knitting again. However, many of my friends knit right through the summer months and are ready for hat weather in October.
My mother taught me to knit when I was a teenager. Even though I’m left handed, I decided I to learn to knit right handed because, after all, we knit with both hands. If you are left handed like me, watching videos is a great way to teach yourself to knit because you can mirror the teacher just as though someone was sitting opposite you.
The Basics of Knitting
The first step in following any knitting pattern it to cast on your stitches. There are many ways to do this, but in the video below I share my favorite way, which leaves a nice finished edge.
First make a slip knot and slide it onto your left needle.
Insert the other needle through the loop below the left needle.
With your right hand, loop the yarn around the right needle in the counter-clockwise direction.
Pull the yarn through with your right needle, and slide the loop onto the left needle.
To start the next loop insert your right needle between the two loops, and repeat steps starting with #3.
Continue to repeat steps 3 through 5 until you have the correct number of loops cast on to your needle.
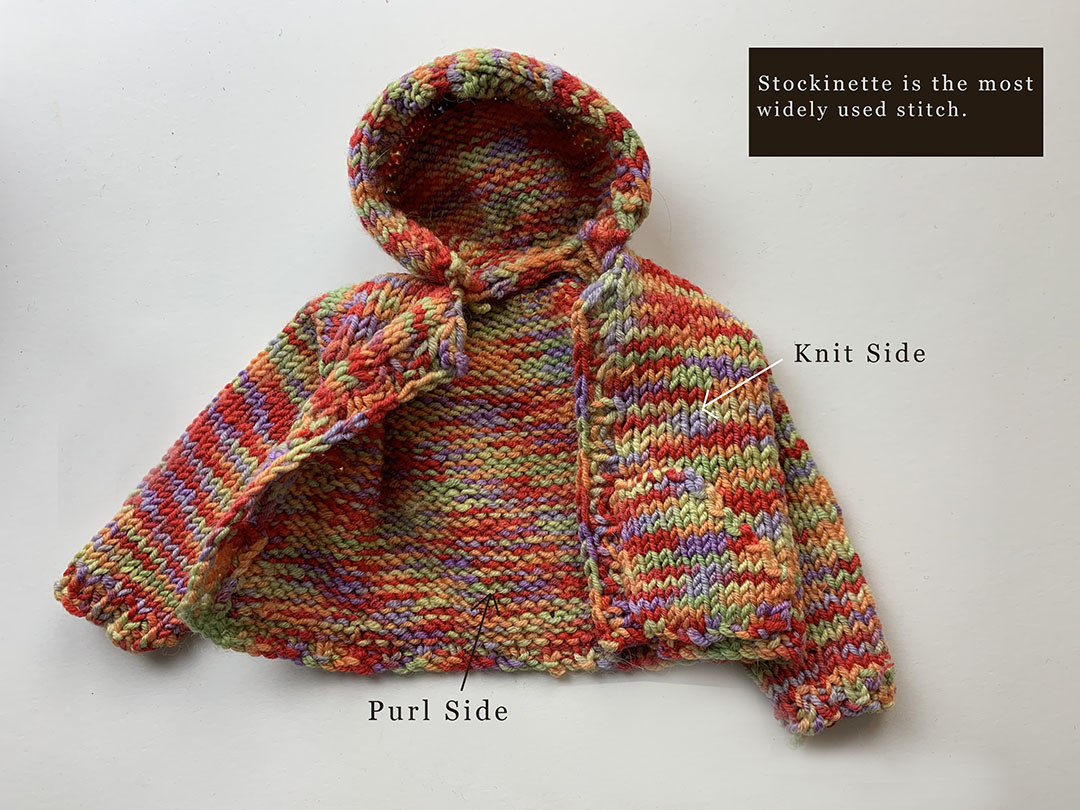
Knit and Purl
Knit stitches usually show on the outside of a simple sweater, and the purl stitches are worked on opposite rows, and are on the inside. To make ribbed bands at the wrists and the bottom of the sweater, knit and purl stitches are alternated either 1:1, 2:2 or 2:1.
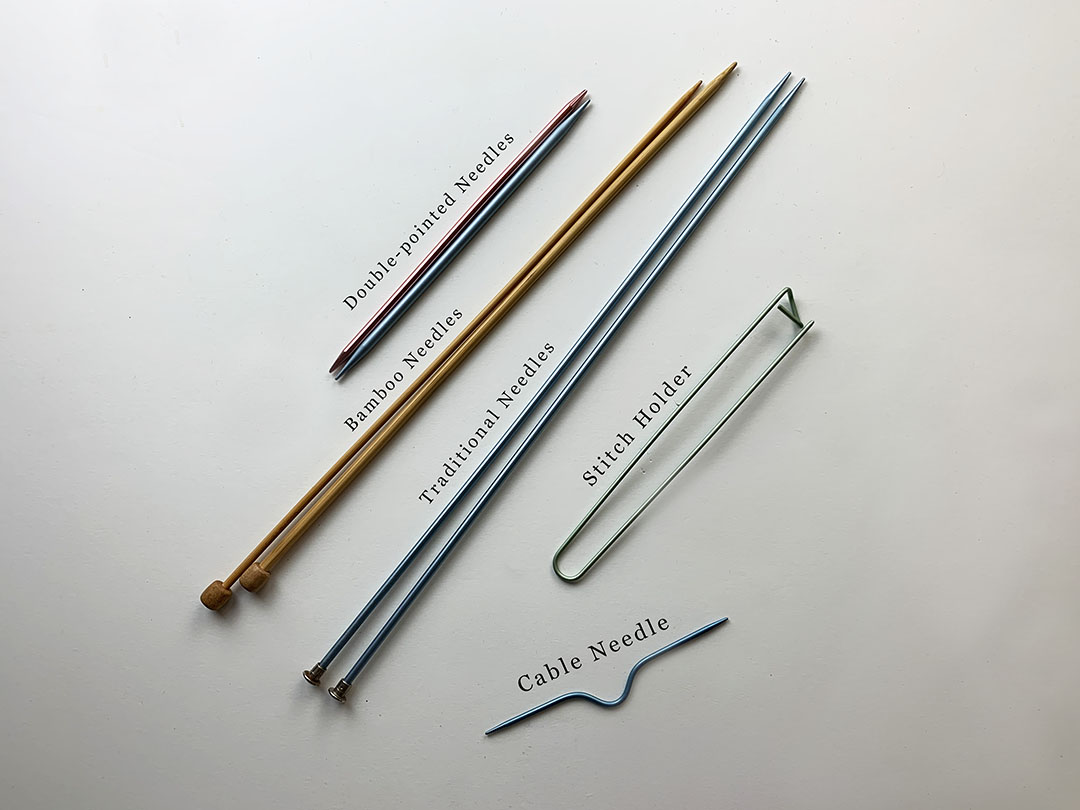
When knitting cable patterns, the purl stitches fill out the background, and the knit stitches make the raised cable pattern with the use of the short cable needle which allows the knitter to add twists and patterns to the knitting.
These are just a couple of common examples of how knit and purl stitches are often
English vs. Continental
Next, lets talk about the two methods of knitting. The right hand method is also called the English method since it is most commonly used in English speaking countries. In other European countries, it is more common to learn the Continental method. Both will feel awkward at first, but both methods can be knit with great speed by experienced knitters.
If you want to teach yourself it knit so that you can later learn Nordic knitting, or another form that uses multiple colors of yarn in the same row, it is best to learn both the English and Continental methods right from the start so you will be ready for two handed knitting in the future.
Below are examples of both the knit and pearl stitches in both methods.
English
The Continental method is the traditional method in many other parts of Europe. It’s sometimes referred to as the left hand method. In the Continental method, you loop the yarn around your left index finger, and scoop the yarn onto the needle in your right hand. In the English method you feed the yarn from your right hand to the left needle. Once your start working patterns like Nordic knits and Fair Isle, you will be knitting with both hands. It’s really your choice which method you use to learn to knit.
Teach Yourself to Knit with the Basics First
An important thing you need to know is that there are two main stitches, knit and purl. When you combine them, it’s called stockinette stitch. In stockinette stitch, the front stitches are knit, and the back stitches are purled. If you only knit in the knit stitch, and used straight needles, it would create a rib pattern. These stitches, knit and purl, are the two main stitches you need to learn in order to knit.
And lastly for the basics, you can knit using either in straight needles or round continuous needles. The sizes will be in US sizes and in metric.
Knitting for Dolls
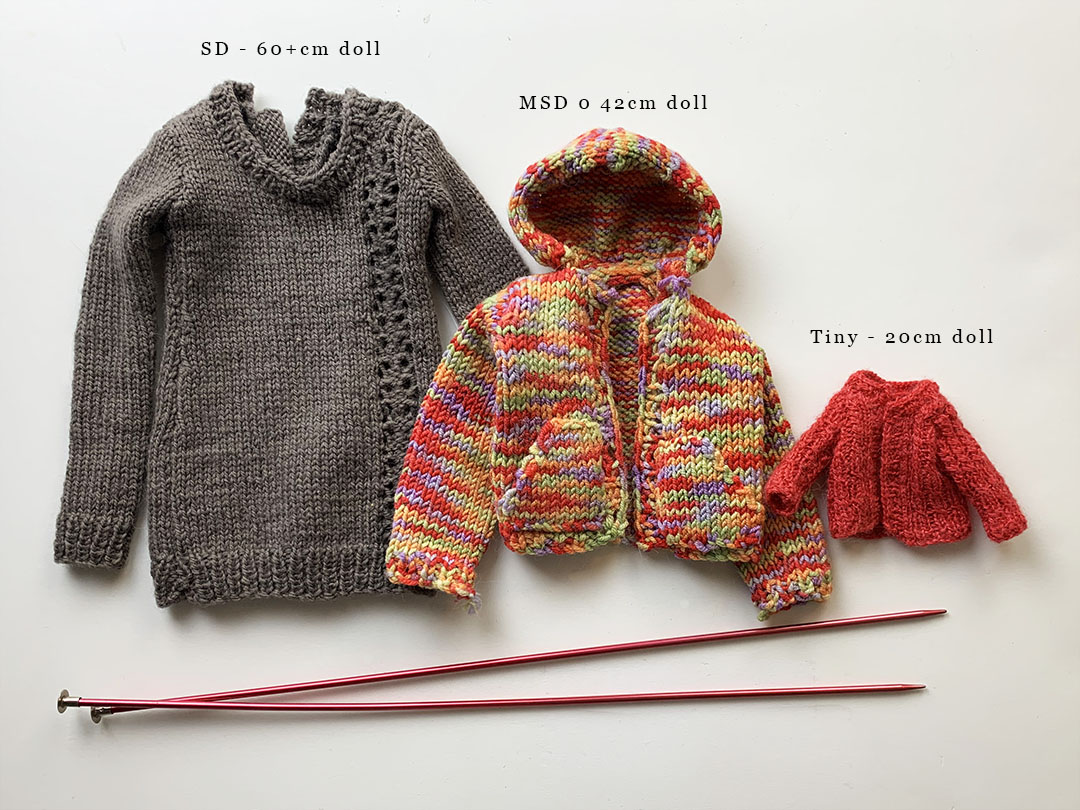
If you want to learn to knit so you can make clothing for your tiniest dolls, I recommend you learn to knit something for yourself first. That way, you learn the basics on larger needles. If you pick an easy project, it need not take a lot of time to complete.
Also, for your first doll project, I recommend using heavier yarn such as worsted, sport weight, or even bulky. Also heavier yarns knit up faster. Wait on fingering or lace yarn until you gain a little experience. These can both knit up nicely with size 1 US needles. Some of the knitters in the Den of Angels knitting forums, talk about knitting with 00000 needles, or even using thread for their yarn and a sewing needles for knitting needles! Believe me, they are not beginning knitters!
Den of Angels is also a great place to find free patters, or links to where you can buy inexpensive ones created specifically for many sizes of dolls. Also, it’s a great place to post photos, or ask for help.
My First Knitting Project
For my first project, I knitted a summer halter top. I chose it because there were no complicated stitches,and I thought it would be easy. The halter top was a flat piece, knit in stockinette, with no sleeves to worry about. But because it was knit with cotton yarn that had no stretch, it was a very poor choice to learn to knit.
I didn’t know how to make even stitches yet, and it really showed. Also, because I chose the pattern for it’s simplicity instead of whether I really liked it, it turned out to be something that I hardly ever wore. Plus, summer was over by the time I finished it!
Easy Way to Learn to Knit
1. Find a book with really good illustrations.
The book I used to learn to knit from wasn’t even purely a knitting book. It was called “Complete Guide to Needlework” and even though it’s an old book, you can still find used copies in used or online bookstores.
2. Practice different stitches or sample patterns.
You can practice cables, ribs and multi-color patterns this way. If you make little swatches of the different patterns, you waste less yarn while you learn.
3. Choose a relatively easy pattern to build up your skill.
When considering a pattern, look at the still level. This doesn’t mean knitting a completely plain sweater. For example, most beginners can handle a simple cable pattern. Also, knitting a pattern makes the process funner, and more interesting. Patterns usually have some sort of rating: easy, hard, beginner, advanced. But also, choose something that you like, and will enjoy wearing.
4. Check out the knitting videos on YouTube.
Sometimes watching someone work a stitch is easier than following the instructions and illustration in a book. Just type in the stitch you want to learn to knit. For example, that’s how I learned how to do the magic loop technique!
5. Visit your local knitting store.
Knitting stores often hold knitting classes, or host knitting groups. While you can definitely learn to knit on your own, having someone to explain the bits that are confusing you speeds your progress. Also, a knitting group is a great way to meet other knitters in your area, and get help from more experienced knitters!
6. Choose a yarn that is easy to work with.
The yarn should have a bit of stretch so that uneven stitches aren’t so noticeable. Consider the weight of the yarn, the size needles it will need, and even whether it is a yarn like mohair or angora that will tangle easily or be difficult to unravel if you make a mistake. Also, think about how the yarn will feel against your skin.
And lastly, make sure to check the gauge of the pattern by making a swatch. I often make a larger one, 8 x 8.
Teach Yourself to Knit with Reliable and Well Tested Patterns
I hate to say it, because I really want to support independent designers, but a lot of the patterns out there are really poorly written by people who might be excellent knitters themselves, but have no idea how to write a pattern. If you just started to teach yourself to knit, look at commercial patterns, or ones in magazines, rather than on Ravelry. Choose the correct level for your skill.
When you get more experienced at knitting, it’s easier to look at a pattern, and see whether it is well written, and if the instructions make sense before you begin.
Also, read reviews of other people who have tried the pattern.
If you buy a pattern online, make sure you print it out. Take it with you when you go to buy your yarn.
And if you buy from a yarn shop, ask the sales person to look it over for you. If it is a small shop, they’ll be happy to help you with choosing a pattern that fits your skill level. Also, they can make sure you find the correct yarn if you need to substitute a different brand.
If I was to Learn to Knit All Over Again …
So did I take my own advice when I started to learning to knit? No, I did not.
After the halter project I made in a hard to knit with yarn, I chose for my second project a mohair sweater. It had an elaborate lace pattern down the front that even today, and dozens of sweaters later, I would still find challenging.
Luckily, my mom stepped in and knit the front panel for me. I knit the back and the sleeves that had a single cable running done them. With her help, I completed a complicated sweater, and got more experience.
I didn’t wear that first sweater much though. It took me several more sweaters to figure out that mohair was too scratchy for me.
That is the nice thing about knitting for dolls. They don’t care how uncomfortable the fabric, or how revealing the style.
So, like I said earlier, if you want to teach yourself to knit in order to make clothing for your dolls, try knitting something for yourself or a friend first. It’s easier to learn when you aren’t starting out on 00000 needles, and need a magnifier to see your stitches.
Anyone Can Learn to Knit!
With the internet, YouTube, and all the great knitting groups that are around today, it’s a lot easier to teach yourself to knit than when I started. Luckily for me I had my mom to teach me.
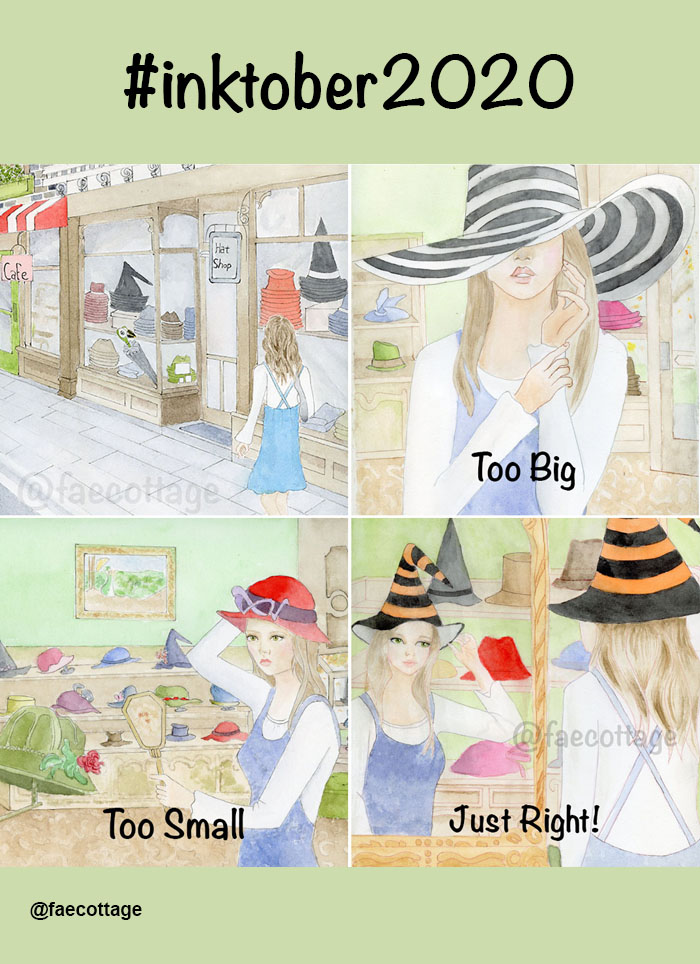
This morning, I posted my first Inktober artwork on Instagram. If you haven’t heard of Inktober, it was started by Jake Parker in 2009 as a challenge to himself to improve his own inking skills. There’s a website, and they have an official prompt list here. But you don’t have to follow it.
The rules for Inktober are really simple.
1. Make a drawing using ink. It can be traced over a light pencil drawing if you want.
2. Post it on any of your social media accounts, or just tacked up for your family to see on the fridge.
3. Use these hashtags: #inktober and #inktober2020
4. Repeat as often as you like throughout the month.
So am I following the official #inktober promt list. No, not really. That’s the beauty of Inktober! No one says you have to.
You can follow the #inktober prompt list, a list from a previous #inktober year, or make up your own list. For my own challenge, I’m making a story about a character who I plan to draw throughout the month, and maybe even into November.
My First #Inktober Drawing is a Leftover from September
I’ve been a little behind on both my artwork, posting on my blog, and on social media this past month. Instead, I’ve been busy creating polymer clay items for my dolls, and to share the tutorials here on my blog.
If you are interested in polymer clay, check the blog again soon, or go ahead and join my list, and you’ll always be the first to know when a new tutorial is out.
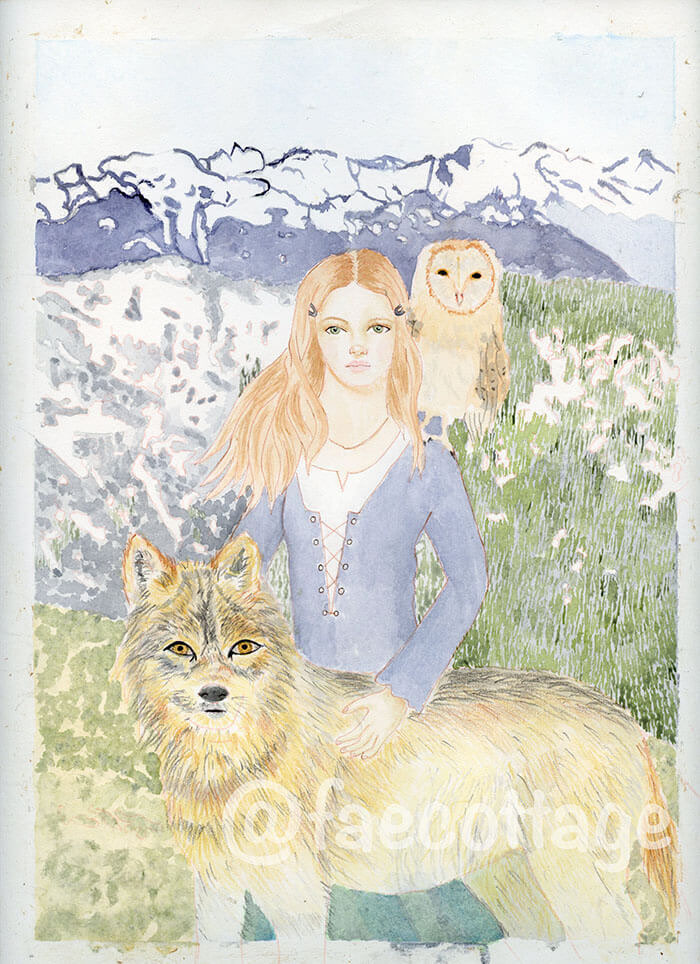
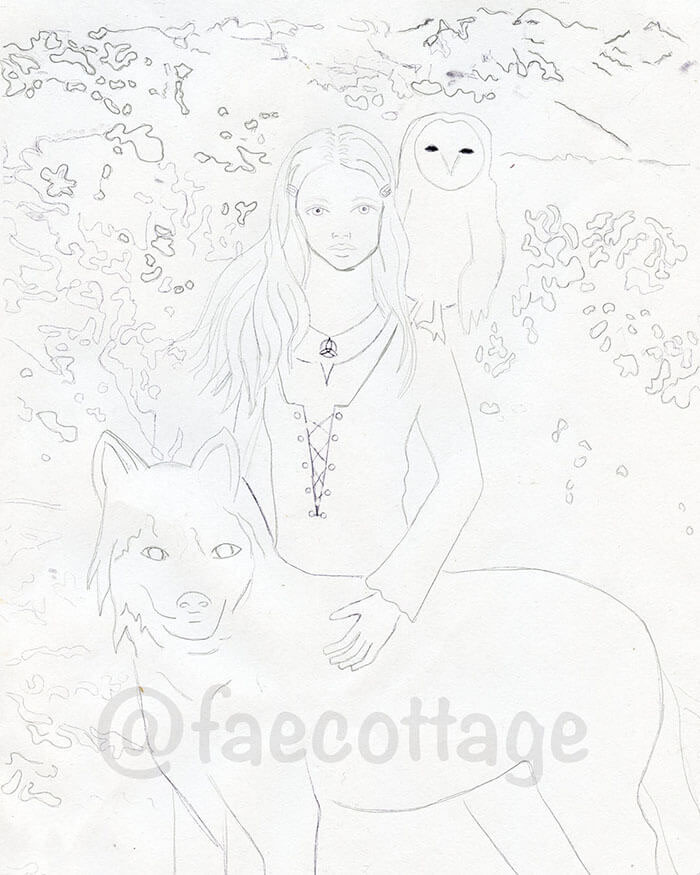
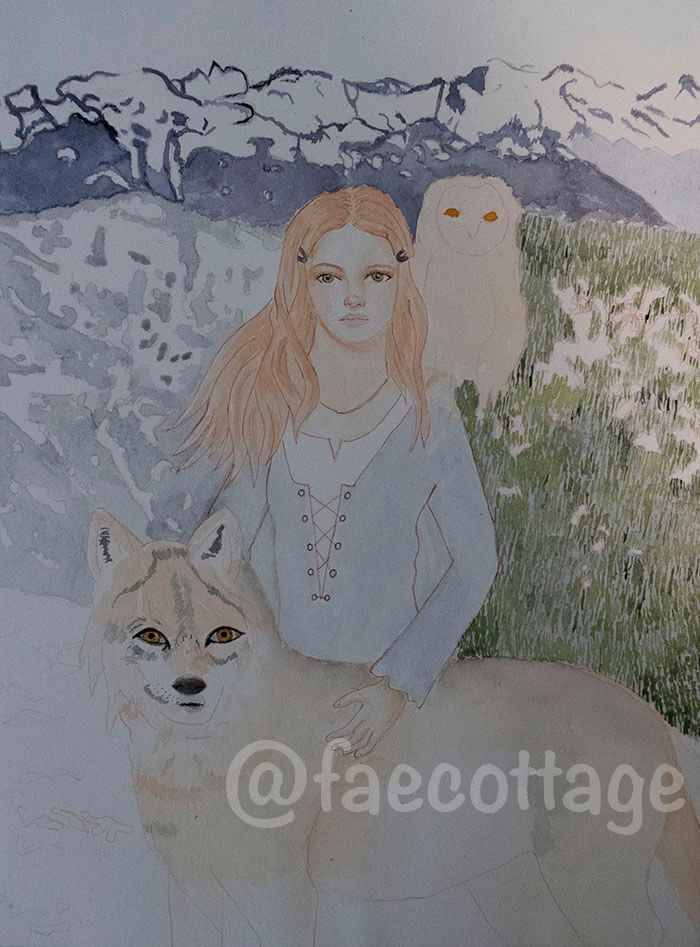
However, I was working on this little painting for a Instagram challenge. I usually don’t outline my watercolors, because I don’t like everything outlined in black, but recently I discovered that Copic multi-liners come in other colors too like grey, brown, green, pink, blue, and my current favorite, sepia!
This watercolor is from an Instagram draw this in your style challenge from an artist I recently discovered, and really like her work, Anna Speshilova. She calls it her wanderer girl. I liked it because I have Scot’s Irish, Scottish Highland, and Lowland ancestry.
One of my personal goals of my artwork is to honor and remember my ancestors. I changed the deer in her painting to a wolf in mine, because wolves are renowned for their loyalty to their pack, just as the Scottish were remembered for their loyalty to their clan.
Another change I made is that the mountains in the background don’t look like the Highlands of Scotland. I painted the Olympic Mountains instead, because after centuries of being uprooted from our homelands in Europe, traveling West, and farther West, the Pacific Northwest is where my family resides. For now.
Inktober Forces Us to Face the Challenges Working With Ink
I think working with ink is less of of challenge for those of us who work in watercolor because neither can be erased or painted over. I like this challenge, because it is analogous to life. Mistakes might be covered up or hidden, but they can’t be erased.
We have to live with them.
And unless we can undo them, we have to make future decisions based on our mistakes of the past. Whether it’s something like not going to university, going to university and ending up with loads of debt, taking the wrong job, moving to the wrong location, dating the wrong person, etc.
I guess this isn’t really a good analogy, but what I’m trying to say is, when you make a mistake working with ink or watercolor, then you have to say to yourself, “Okay, what do I do now?”
For example, in my painting, I was going to have my character wearing a plaid skirt. I even looked up Scottish clan plaids to find one of one of my ancestor’s surnames.
As a result, I didn’t pay attention to the other colors I was using in my watercolor. When I started painting the blue and green plaid, the shades didn’t match well. I probably could have come up with a better solution, but I just painted over it with Payne’s Grey. There were a couple of little ink boo boo’s too, but those were easier to fix.
So don’t be afraid to make mistakes, whether it’s in your painting, or your life. The experiences help us to make better decisions next time.
What’s Next for my Inktober Plans, You Ask?
While I was on vacation on the Oregon coast, I started working on some witch paintings, unaware that this is also #witchtober .
These drawings tell a story. It starts with buying a hat. I hope you’ll like it. I’m having fun drawing it, but the drawings are taking me a lot longer than I planned. Even though I came up with 31 ideas, there won’t be 31 paintings. I’ll just have to see how fast I can work, and still have time to complete all my other projects as well.
If you want to learn more about Inktober, head on over to the website, or type in #inktober on any social media, and check out the artwork.
I think I might treat myself to a Koh-i-Noor pen before the month runs out. The DickBlick website describes them as follows: “Technical pens were the mainstay of the designer and illustrator’s craft before the development of computer graphics. Now, many artists and design professionals are rediscovering the technical pen because its handiwork, in expert hands, stands out almost magically against the bland precision of computer rendered graphics.”
Keeping Up With the Wolves
Wolves are endangered in every part of the world. These beautiful and mysterious animals are often misunderstood, misjudged, and their numbers annually culled to a genetically unhealthy level in many areas.
They deserve protection, and the freedom to repopulate the regions where they once thrived. These are two Twitter sites I discovered dedicated to wolf conservation — Wolf Haven and Wolf Conservation Center. Also, here’s great news I found when looking up these sites. Nordstrom has banned the sale of fur coats as of September 30, 2020. Finally!
I had great plans for #Inktober2020, back in September when I was on vacation, and had too much time to think, and make big plans. However, I should have been setting realistic goals.
Also, most of my art supplies were at home so I couldn’t really get started.
In fact, while I was on vacation, I planned out a whole month of paintings for #Inktober, one a day. I drew some sketches on Procreate. I even took some on location photos for street scenes. Which I’m sure I’ll use someday.
But when I got home, reality set in again. I realized that there was no way I could complete a painting a day. Setting goals like that for myself just creates a lot of anxiety.
However, I’ll share the paintings I completed here. You can see the sketches and progress shots on my Instagram. Perhaps the story will be continued . . . next #Inktober .
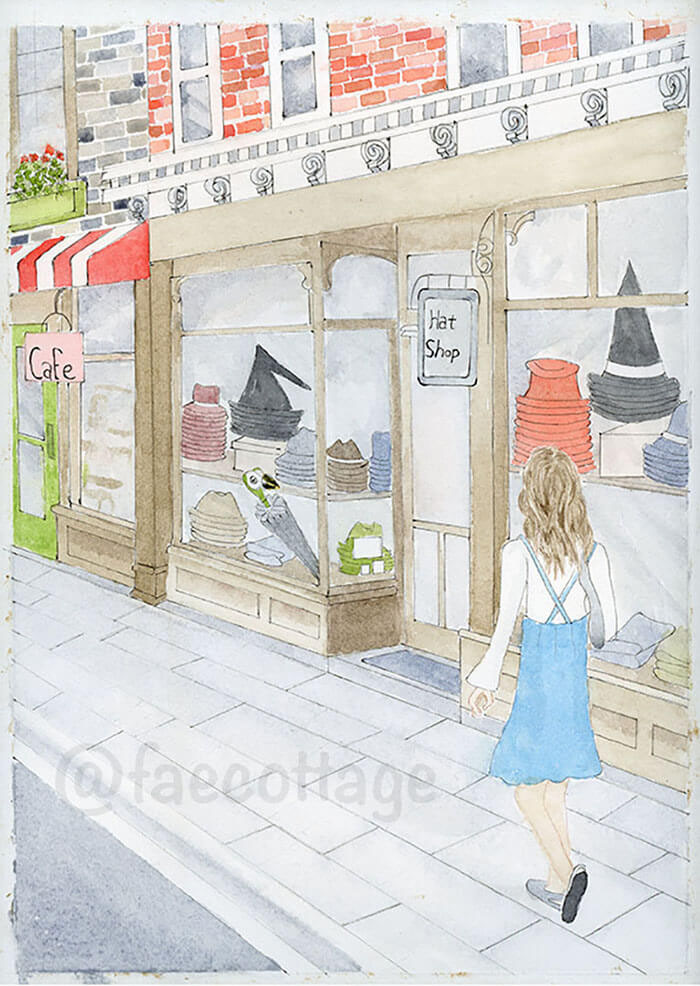
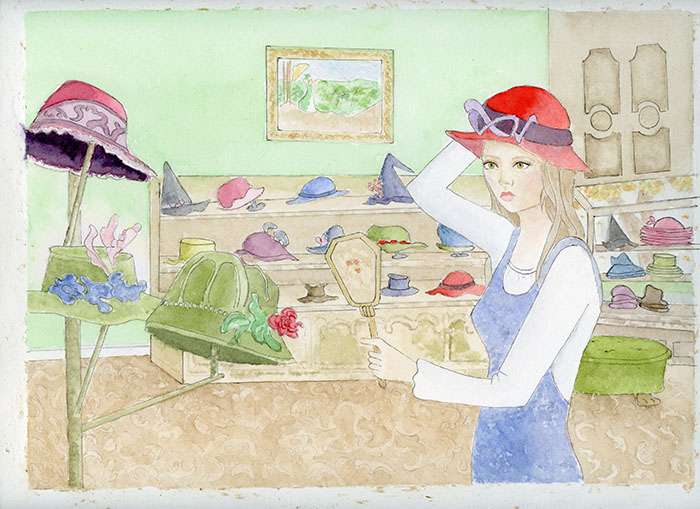
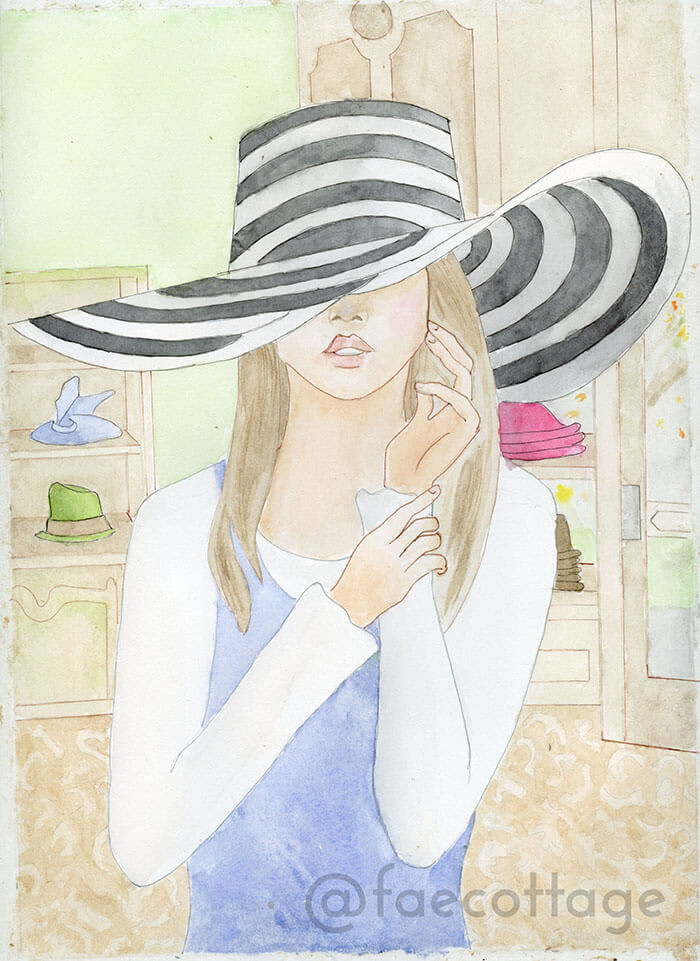
In the watercolor story that I imagined, my character started off visiting a hat shop. After trying on several hats, she settled on a witches hat, of course. And that’s as far as my paintings got. I posted the last watercolor I finished, of her trying on the witches hat to Instagram on Halloween.
See, the other thing is, when I was planning all of this lovely painting, I sort of forgot that I’m really a sculptor, and a clay artist. And a blogger. And maybe that’s a good thing. When you live with anxiety, creating too many goals for yourself just increases your stress levels.
How Unreachable Goals Create More Anxiety in Our Lives
Hobbies are meant to be an escape from our stressful lives. But sometimes they take over and create more anxiety instead of relieving it. Posting our art and our dolls on social media just increases the stress to create more, or keep up with “friends” we don’t even truly know.
Even with just focusing on drawing, and painting watercolors throughout the month of #Inktober, I felt a bit overwhelmed because I’d set a goal I couldn’t reach.
It would have been better if I’d said to myself, “Just have fun with this!” Or “You’ve never inked paintings before. It’s okay if it doesn’t look perfect.” Positive self talk is not one of my strengths though. I tend to be a perfectionist prone to harsh self criticism.
So my character didn’t get to meet a black cat on the way home, chat with a neighbor, or borrow his broom on which she flew off to London. There were lots more plans, and I have them all written down. Somewhere.
But on a bright note, I did manage to finish 2 watercolor paintings in one week, and post them to social media!
How to Set Realistic Goals
When we make realistic goals for ourselves, it’s important not just to make a “to do” list for the rest of the year. In addition, spend some time thinking about what your day is like and how much time you have to work on the items on your list.
For example, I started learning to draw when my son was a toddler. The only time I had to myself was his afternoon nap time because I was following the attachment parenting model.
If I made a goal that I was going to practice drawing for 2 hours a every afternoon, learn to paint, etc., I never could have reached it, and would have ended up feeling angry and frustrated with myself.
Instead I set a goal to draw every day while he was napping. Some days, I got well over an hour to work on my hobby, but other days he only napped for 20 minutes, or I wasn’t able to get him to sleep at all.
Goals for Mental Health
Yesterday morning I got up an hour later after the time change, Since I haven’t changed my bedside clock, it looked like I’d slept till after 7!
I set about creating some goals for the week that I think I can achieve, but also I thought about what active steps I can take to reduce anxiety.
We are all living through exceptionally stressful times. It’s easy to get caught up in the constant flow of negative information that flows into our lives through TV and the internet.
These are the goals is what I wrote down to begin practicing daily:
Meditate 30 minutes every day
Practice conscious breathing
Go for a walk in the woods by myself
I have found that just reading articles or books about anxiety does nothing to alleviate it if we don’t take positive steps to actively reduce it, and make them part of our daily routine.
5 Tips for Setting Realistic Goals
Prioritize what you want to achieve.
Limit your list. (Only you know what is realistic for you.)
Set a time line, for example I keep both weekly & monthly goal lists.
Make adjustments when necessary.
Don’t procrastinate! Start working right away.
This is my list of things to accomplish this week:
Complete new drawing and start watercolor.
Finish blog post for Tuesday ** I did this, obviously!
Work on polymer clay food tutorials for BJD sized dolls (I’m making onions!)
Paint new head.
Just writing down the most important things that I want to finish this week makes it seem a little less overwhelming. Plus, when we write down a list, and keep in where we can find it to refer back to, we’re less likely to waste time on stuff that’s not part of our goals for the week.
Will I Do #Inktober Next Year?
I’m not sure yet. Somewhere in the month of October, I remembered that I moved on from drawing to sculpting a long time ago, and there must have been a reason.
I used to love to sculpt so much that I sometimes didn’t want to go on vacation because I couldn’t pack my clay along in my suitcase.
Somewhere, between home schooling my son, and caring for my mom, I told myself I didn’t have time to sculpt anymore, but I’d pick it up again in the future. And while I was telling myself that, years went by. It was a big mistake. We should never put our dreams on hold.
I’m back to sculpting now. I’m starting slow, making accessories for the dolls I sculpted in the past, and the BJD dolls I collect. I shared my first tutorial last week, How to Make an Easy Tomato Cane.
I have lots of items to make and more tutorials planned. As my husband and I complete my doll rooms for my MSD sized dolls, I’ll be making many of the furnishings, and the food. I’ll share my how-to instructions here in my Resource Library if you want to follow along. You can get a free password here.
When my grandmother lost her wedding rings in a house fire in the 1940’s, instead of a diamond, I don’t think they were in style yet, my grandfather bought her a beautiful sapphire ring to replace them. The ring was not precious because of the size of the stone, or the antique setting. It was precious because it had belonged to a lady whose influence and love I feel even today.
The Story of How my Grandmother Lost Her Wedding Rings
This is the story my mother told me about the sapphire ring, and how the wedding rings were lost.
There had been a little power outage at their home. My grandmother was probably there alone, so she got a stool, went outside and climbed up to reach the fuse box. The rest is quite too horrible to tell, but the stool tipped, and one of her fingers was torn off at the knuckle joint. As a result, the wedding rings were put in a glass jar on her dresser until she healed, and could wear them again.
However, a few days later, a spark from the chimney lit the roof on fire, and subsequently, the house burned to the ground. Apparently the little local fire department couldn’t get their truck started when they got the emergency call. A neighbor later said the fire truck drove past late that night. My mother always joked that they saved the foundation and the chimney.
My mother also told me how she and her sister spent days sifting through the ashes, looking for the ring. Clearly it was an impossible task, especially since my grandmother’s bedroom was beneath the section of the attic where the canning jars were stored. As a result, all of that glass melted in the fire on top of everything that had been in her bedroom.
Anyone who has been through a catastrophe like a house fire knows what a loss the objects containing sentimental memories are, but the greatest loss is when you lose a family member. Luckily, my grandfather was home that day, and was able to wake his father-in -aw who was taking an afternoon nap in the attic. Everyone was safe.
How the Sapphire Ring Became Mine
I don’t have any memory of my grandmother wearing her beautiful sapphire ring. When she died I was only 12. However, I do remember opening my mothers dresser drawer, taking out her jewelry box, and looking at it frequently. Sometimes my mother would let me try it on.
“You can’t wear it until you’re older,” I was always told.
How much older, I’m not sure, because at around the age of 16, I took it out and started wearing it. I realize that wasn’t how my mother intended for me to have my grandmother’s ring. I imagine she would have liked to have given it to me on a special occasion.
But the ring had a power over me. I was like Golum who craved to wear the ring, and I couldn’t wait until I was older.
It was really loose on my finger. Even though my grandmother had been quite thin as an old lady, she had been heavier when my grandfather gave it to her.
My mother never told me outright to put the ring back, but she did express concern it would slip off my finger. So when I was in my last year of high school, she had it resized. I wore it in my graduation photo.
The Ring Vanishes
By the time I was in college, I’d lost a lot of weight since high school. The ring was getting loose again. My last memory of the ring was playing touch football at a park on New Year’s Day in the cold. But I also have a memory that I put it somewhere. Whether it slipped off my finger on the football field, or I placed it somewhere it can never be found, I haven’t seen the ring in many, many years. And it’s loss is heartbreaking to me, because it was the one thing of my grandmothers that I had.
Lessons From Loss
We all do things as teenagers that we have misgivings about. And I regret taking the ring that wasn’t mine yet, just because I knew it someday would be.
I once asked a psychic what happened to the ring. She told me I did lose it on the football field. “A little girl had found it,” she said. And it was precious to her. Precious. She also said I lost the ring because it was never mine. It hadn’t been given.
When a New Ring is Forged
My husband doesn’t have the power to journey to the Mountain of Doom to reforge the ring for me. And luckily this ring doesn’t represent that kind of evil. No. It represents a woman from another era who I love, admire, and remember.
But what he does have is my high school photo which shows the rings design clearly. Someday when we have the extra money, he’s promised we will have it copied. I will be patient this time. I hope I have learned this valuable lesson. To never again take what I’m not given.
If someone asked me whether or not I was brave, I would probably say no. There’s still a very big part of me attached to that kindergartner who was so scared to go to school, she got sick in the morning. My extreme shyness made me a target for bullying in school.
Clearly, I still don’t look for adventure. I don’t climb mountains, or skydive, or travel alone to distant places where I don’t speak the language.
Consequently, I miss out on a lot of opportunities in life. Whether it’s attending classes or meeting new people, I miss out because I prefer staying at home.
I’m not as shy as when I was a child, and I worked hard to overcome it. But I still consider myself an introvert.
How my Son Reminded me of Brave
Growing up here on the island, summers were a flurry of classes and camps for my son before Covid. In the last few years, he emerged from a shy little boy to someone who, while still shy, loved to swim, acted in plays, played tennis on his high school team, and learned to sail.
He was only able to attend one camp last summer before starting his senior year in high school. But we were grateful the sailing camp was able to run. He had been attending every summer for 4 or 5 years. I still remember the last day of his first year of camp, the instructor was givingt out awards, and announcing who passed to the advanced sailing level.
When he called my son forward, he handed him his certificate he said, “This young man is fearless out there.”
Even so, my son still didn’t think of himself as fearless. Or brave. He still thought on a day to day basis of all the things he couldn’t do, or the things he was scared of. Nevertheless, when he was out there, just him and his boat ,the wind and the sea, he was and is fearless.
And he inherited from his grandfather the courage to stand up to bullies when he saw someone picking on one of his classmates.
Many of us are like my son. Maybe we think too much about how we will handle a situation, and run it through our minds again and again. Most often, that situation never comes up, so all of our rehearsing for the worst was not necessary.
But when we are out there in the moment, and the winds of life hits us, or when we stand up to mean bullies, we are braver than we know.
Why Introverts Relive Bad Memories
It should be noted, if you are shy, or an introvert, letting go of memories and experiences from our past proves difficult, because we ruminate on them. We live them over and over. Importantly, this is the very reason we must work through them. Because imagining the things we don’t want to happen increases the very possibility of attracting those things to us.
It’s not easy as an adult to step out of our shell. It’s difficult to put ourselves in situations where we, or our work, might be criticized, and made fun of. Or we express a belief and someone ridicules it. Nowadays, if we say the wrong thing, a thing that just last year it was okay to say, it can even be labeled as hate speech online.
But whether you are an artist, a writer, or you run any sort of business online, you need to be noticed. And we all have an innate need to share our opinions, whether is it with a friend, a neighbor, or the world.
Standing Up to Bullying in School
In particular, when you encounter a bully, whether in school, or the workplace, and definitely online, remember they are not really a brave person. Not only are they not a brave person, but the people who surround them are not brave either. They are afraid to speak up, and they defend the bully’s target because they fear becoming the next victim themselves.
Bullying in school seems almost epidemic today. We used to call it being picked on. And a lot of parents and teachers didn’t usually step in to help. My own mother wouldn’t even consider letting me change schools when I begged her. Instead she repeated things to me like, “Bloom where you’re planted,” or “You’ve just as happy as you make up your mind to be.” Then she returned to reading her evening newspaper.
In a way though, she was right. My own energy attracted the bullies. Being liked by the popular girls became too important to me. I wish I could have been like my son, who just doesn’t care about being popular. And speaks up when he sees someone being bullied.
But I did care about what the popular girls thought of me. Too much. And it made me a target. Now, as an adult, I realize that I wouldn’t want to be friends with them anyway. Not if being friends meant I had to watch silently, or join in when they bullied others.
Even if my mother allowed me to go to a new school, but I carried the same energy, I might have been picked on and bullied all over again. But I was really just asking her for a new start. A chance to change my energy in a new setting.
Change Location and Change Your Energy
I finally got a chance in a new setting when I went to college. My father died the previous year, and I didn’t care about being popular anymore. And my new friends at college? Many had been the popular girls in high school.
As a result of my own experience with bullying in school, if my child told me they were being bullied, I would listen and I act. Absolutely, it’s one of the reasons I choose to home school the last couple of years. It gives us more choices, and we are not tied to the school or their policies.
Most importantly though, standing up to a bully is one of the most fearless things you can do.
Online Bullying is the Perfect Domain for Hateful People
Bullies still exist in the adult world. It’s easier than ever for them to hide now behind social media accounts and avatars.
Stay Safe Online has tips on what to do if you experience Cyber-bullying.
These are things you can do to make yourself safe from online bullying while still sharing your light with the world:
If you experience a cyberbully in a forum, or see it happening to someone else, report it to a moderator
Use moderation on your website, or social media channel, and manually approve comments if that is an option. Or have a friend moderate for you. Regularly check the comments and delete things that are hateful, or must plain mean.
Don’t respond to a bully, just delete. They want a reaction .
Bullies in our adult world are still angry people, and they’re scared. Remember that. They’re scared. Otherwise they wouldn’t bother making fun of other people, or even trying to destroy them. It’s easier to stand up to them when we remember that they are the ones afraid.
Indeed, they are in politics, and they run counties. They might be raciest, but equally, they might hide behind titles of Social Justice and Equality while they nevertheless bully others. What they have in common is they are all full of hate. Often, they are scared. And they rely on us being scared too. That’s how they operate.
Face Down Bullying in School and Online
Whether you are facing bullying in school, at work, or online, the more memories you can recall of the times you have been brave in the past, the easier it is to stand up to them now. Standing up to a bully isn’t only brave, it’s fearless.
When you are out there in the world and something bad happens, how often have you been the one to make a decision that was fearless? Did you react on your instinct to do what you felt was right without thinking about the consequences down the road?
Being brave doesn’t mean not being scared, it means being scared, but doing the thing anyway.
When to Seek Help
If the memories in your past are really strong ones, (and for those of us who faced bullying in school, they sometimes are), please find someone to help you work through them. Bullying often leads to chronic anxiety which is now days considered as much of a disease as diabetes, or hypertension. There is no shame in seeking help.
Have you faced bullying in school, the workplace, or online? How did you handle it?
Many of us love to make resolutions in January, and plan out our year. How many creative goals in life did you set for 2022, and then abandon after a week or two? Whether it is learning how to play an instrument, finish a craft project, or learn a new language, it’s important to review your creative goals periodically during the year.
Since we just started the last quarter of the year, now is a good time to pull out those goals we set last winter, and focus on finishing up our projects.
I like to call these lists we make at the start of the year goals instead of resolutions, because most of us don’t keep resolutions very long. We abandon them quickly, often it is because they don’t reflect our true goals in life.
Also, goals can be broken down into steps. And they can be created anytime of the year! Resolutions were always hard for me because usually they would revolve around creating better eating habits, losing weight, etc. However, in my family there are 2 important birthdays, with chocolate cake involved, in January, so there’s little hope for me of starting a new diet on January 1!
My Goals in Life as We Head into Autumn
In an earlier post, I mentioned how I tried casting my doll into wax last year, but the recipe didn’t work for me. I’m working on refining the original pieces of both my 1/6 scale and 1/4 scale dolls.
It’s slow work. But I keep going a little each day while I can still get outside to sand before the weather turns too cold. However, sometimes it feels like I’m not making much progress, as I have other goals that jumped in front of finishing my dolls.
Casting a doll into resin in the future is still my #1 long term goal. Hopefully I will have a workable prototype finished by the end of the year.
Other things I’m working on:
Completing all of the dolls that I have started over the last 3 years
Making new miniature polymer dolls
Creating a diorama and accessories for my dolls
Drawing every day
I know! I’m really busy with all my hobbies!
Review Your New Year’s Resolutions
2022 will be over before you know it. But don’t let the last quarter of the year go to waist. Take some time to review your creative goals in life. Now is a great time review your list, and see what goals you can make and/or complete before the end of the year.
Maybe some of the goals you set in January are completed. That’s great! You can check them off.
Other goals might have been forgotten, or you lost interest in completing them. Now’s the time to remove them. If you want them to stay on your list, figure out how you can go about finishing them.
Deciding to Finish or Discard a project
When our craft area becomes filled with half finished projects, it is no longer an enjoyable place to create. But you paid good money for your supplies, and it is hard to get rid of them. It’s much easier to close the closet door and say, “Someday I’ll finish it”.
Make it a goal to finish all of the projects you have stared this year, or clear them from your space.
Is your computer filled with programs you don’t know how to use? On my own computer I now have Photoshop, Illustrator, Python and ZBrush. Of the four of those, I understand only Photoshop well.
My unfinished projects have moved with me from house to house. One of my goals in life is to finally finish these projects, or abandon them once and for all. They have moved their last move with me!
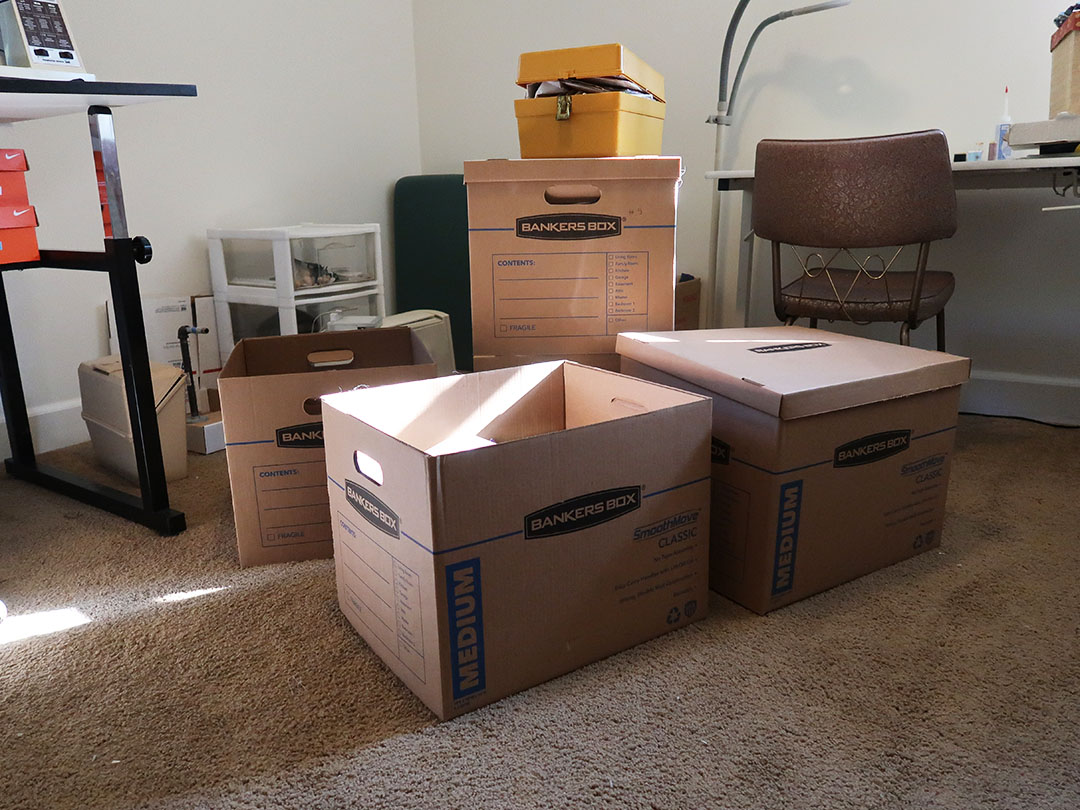
It’s really hard to let stuff go. I get it. In fact, my work space became unworkable because it was filled with stuff I’ll never finish. So I sorted everything into boxes, but some of the projects just had to go into a bag, and out to the trash.
One such project was a very intricate sweater. I’d finished the back and the sleeves, but ran out of several colors of yarn. I know I’ll never find yarn to match, and it’s not a style I like anymore. It was so, so hard stuffing it into the bag after I’d worked hard on it. But now it’s gone from my life and I have extra shelf space in my closet.
How Kids Help Us Learn New Skills
Sometimes it helps to have a teenager around, because by helping my son accomplish his goals in life, I learn things I wouldn’t attempt on my own. When he was younger, I volunteered in his school art class. It’s great to inspire our kids to make art when they are young. It can become a life long hobby, or maybe even a career.
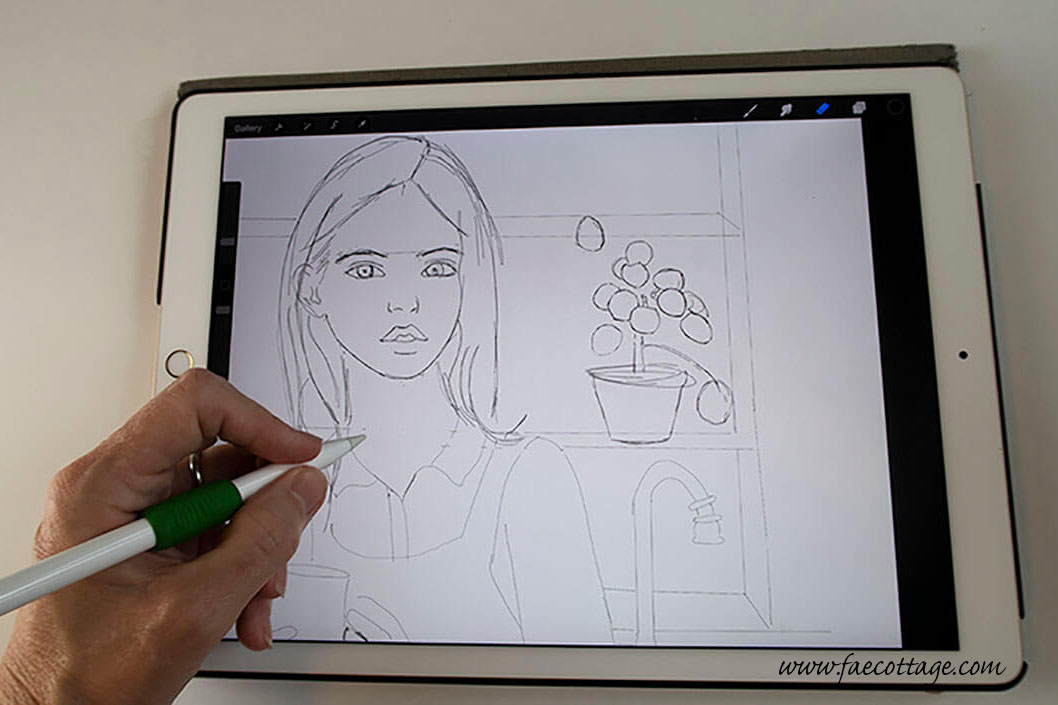
One of his goals this past summer was learning to create his own comic. In addition to helping him learn to draw, in the last year, we learned to use Procreate on the iPad, and to draw on a Wacom tablet with Clip Studio Paint.
I am also becoming more confident learning other computer programs that intimidated me in the past. For example, he taught me some things about using Photoshop I didn’t know that he learned in a class at the high school. We started learning ZBrush together. I might try learning some Python or Unity someday.
In addition we take an afternoon break many days and play a little tennis, because sometimes you have to do things just for fun.
5 Steps to Set Goals in Life You Will Want to Finish
1. Make a List of all your unfinished projects.
Spend some time thinking about each project, and what satisfaction you gain completing it. Only keep the ones you still feel excited about. If you still have all of the pieces and the instructions, you can send the others to the thrift store. Otherwise, toss them into the trash.
Think about your why.
What was the original reason you started the project? Is it in line with your goals in life? I started to learn Rosetta Stone French so that I could communicate with my French friends on Facebook, travel to Paris, and hopefully take part in the Ldoll ball jointed show someday. And also because I’d taken a year of French in college.
But I know most people in France do speak some English and this festival seems to no longer exist, so I need to decide whether that is enough of a reward to spend the many hours to become more fluent.
Even though some hobbies don’t clutter up your home, they still need to be mentally discarded if you chose not to pursue them. Sometimes you have to give up on one hobby so you can focus your energy on what you really want. Once you know what that is.
2. Choose just one project to finish at a time
Once you discard all of the projects or hobbies that you are no longer interested in completing, pick one project and break the steps down into individual goals. We all spend so much of our time multi-tasking. Now the goal is to focus on one thing at a time.
For example, I had a box of my small polymer dolls that all needed outfits. It was overwhelming. When I opened that box, I would just say to myself, “Why did you create so many dolls, and not complete their outfits?” And feeling intimidated, I closed the box again, and placed it back on a shelf. Oh course, I knew the answer. My love of sculpting outweighs my love of sewing. However, a goal this fall is to finish those outfits.
3. Put it on your schedule
Next, schedule a time to work on your project. Put it onto your calendar. If it is something like learning a new computer program, or learning a language, you are going to be working on it for some time. However, an unfinished sewing project will be completed much faster.
4. Research if you need to
Besides reading books associated with your hobby or craft, find a forum or Facebook group. The books will help you stay motivated, and through the groups you meet people who share your interest. Generally, seeing others posting about what they are working on, or learning, will motivate you to work on your own hobby.
5. Share your work with the world
Lastly, post your work online. You can post on social media, a blog, or a forum. For my own accountability with my artwork, I’ll start posting more regularly in both Facebook and Instagram, and also Den of Angels.
What Goals in Life Would You Like to Complete?
Start thinking about your big goals for the rest of the year, and break them down into easy to accomplish steps. Maybe get out a piece of paper and make a list. Also think about what you want to let go of and clear out of your home physically, and out of your mind mentally. It will make space to finish those hobbies that truly reflect who you are, and your goals in life.
I’ve started clearing out my craft room, and sorting things into boxes. I create a list for each box so I will know exactly where to find things. My plan is that if at the end of the year, a box has not been opened, it’s time to move it down to the garage, and perhaps maybe to the thrift store.
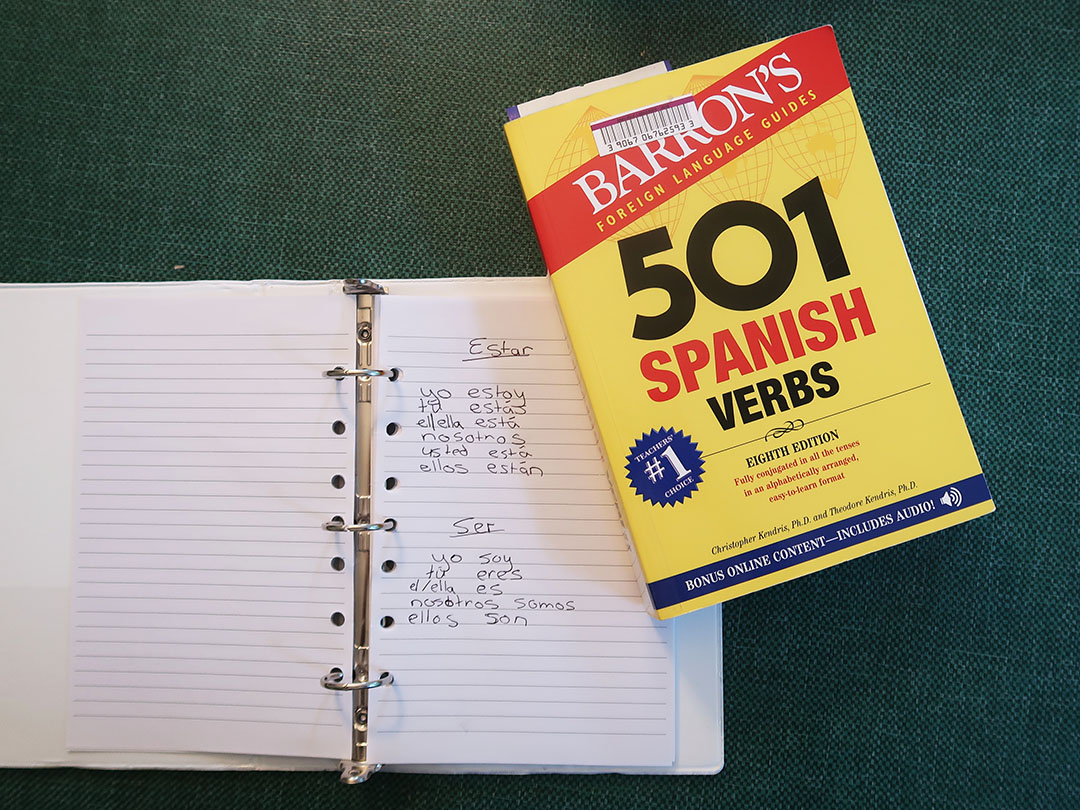
So am I sticking with learning French? No, decidí aprender español en su lugar porque queremos visitar México. (No, I decided to learn Spanish instead because we want to visit Mexico.) I’m using Mango Languages through our local library. Sometimes we have to let a goal go so we can replace it with something more beneficial to our current life.
Also, my son is taking Japanese online at college this fall, and I’m starting to learn along with him since I’ve already learned the most common for the 3 Japanese alphabets — Hiragana!